
Connecting your EZLynx system to Fuse involves a few simple steps. You will be sending a handful of specific reports generated within your EZLynx system to a unique email address found within your Fuse set up wizard.
You'll want to navigate to your EZLynx list set up page and select "Configure EZLynx Integration" to get started.

How Does it Work?
For each of the reports we will create, listed below, we will go through a two-step process: Baseline Sync and Ongoing Sync setup.
-
Baseline Sync: Manually export each report with five years of data and personally email those reports to Fuse using a unique email found in the Fuse setup wizard.
-
Ongoing Sync: Schedule each report so that EZLynx automatically emails Fuse on a nightly basis with a rolling 12-month date range. This helps to keep your sync updated.
Report & Filter Settings
Generally speaking, all filters on all reports should be set to “Select All” unless otherwise indicated below.
EZLynx allows you to include up to 5 years of data. To make this work, when configuring your date range, the end date must be set to today’s date, and the start date needs to be five years ago, but with the calendar date one day later than today.
If you are setting up your EZLynx integration during a Leap Year, please add an additional day. For example: if today is 04/23/2024, the start date must be 04/25/2019.
What reports are needed?
We will be creating the following 3 required reports. There is 1 optional report that may be included if you process claims within EZLynx. Each report listed below has its own filter settings when generating the Baseline Sync. Please review them before generating the report.
File Size Limits
EZLynx can automatically email scheduled reports under 12 MB. If a scheduled report produces a file over that size, it will fail to run. This is most likely to affect the Applicant Master or Policy Master report since they contain the most data. These approximate limits should keep your files under the EZLynx file size limit:
|
Report |
Limit (approximate) |
|
Applicant Master |
21,000 Contacts (Including “Insureds” and “Co-Applicants”) |
|
Policy Master |
20,000 Policies |
Baseline Sync
-
Set up the report with the appropriate filter selections.
-
Manually export it as a CSV.
-
Email the CSV to the unique email address found under Item 3. on the second page of the list setup wizard. You can also wait and upload all of the generated report files to Fuse.
-
Save the report in EZLynx by clicking the save icon. When saving, add “Fuse” to the report name so you can easily find it in the future, and set the Date Range to “Rolling 12 Months.”
Applicant Master
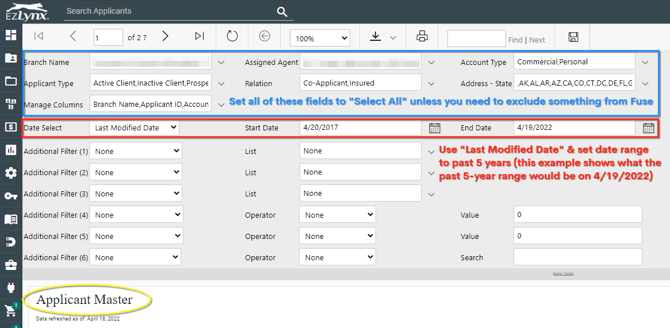
Important notes:
-
Use “Last Modified Date” and set the dates to a range covering the past five years.
-
Set all other filters to “Select All.”
Policy Master

Important Notes:
-
Set “Date Select” to “No Date Filter” and don’t modify the “Start Date” or “End Date.” They are not used.
Set all other filters to “Select All.”
Policy Transaction Master

Set up the Policy Transaction Master report with the following filter selections:
- Only select the following 5 fields under the “Manage Columns” drop-down.
- Effective
- Transaction Type
- Expiration
- PolicyID
- PolicyTransactionID
- For “Date Select”, use “Policy Last Modified Date” and set the dates to a range covering the past five years.
Set all other filters to “Select All.”
Ongoing Sync
-
Under EZLynx’s “Saved Reports” section, locate the report, click the 3-dot menu in its upper-right corner, and click “Schedule.”
-
In the “Schedule Report” popup window, enter:
-
Scheduled Report Name: Copy the Saved Report Name
-
Recipient Email: Paste in the unique email address found under Item 3. on the second page of the list setup wizard.
-
Report Format: CSV
-
Frequency: Daily
-
Run On: Today’s date, at 7 AM.
-
Note: For the Ongoing Sync "Run On," ensure you are spacing out each report by 15 minutes. For example, if your Applicant Master report is set for 7 AM, please ensure the Policy Master is set to "Run On" 7:15 AM.
Uploading EZLynx Files into Fuse
You are also able to upload the reports you generated and saved as CSVs into Fuse, instead of manually emailing them to your unique email address. To do this, return to your list setup page, and click on the "Upload Files" option.

Final Check
Once you have completed the Baseline Sync and Ongoing Sync, and the files have either been emailed to or uploaded directly into Fuse, your setup is complete!
You are able to keep track of your reports under the "View Report Status" option within the EZlynx list setup wizard. When the circles in this view are all green, everything is running smoothly!
If you have questions or concerns about your sync, please reach out to our team at team@agencyrevolution.com. We'll be happy to help.