
This applies to our Applied Epic and Epic BDE Integrations
Fuse allows you to send email from any Epic Servicing Role on the customer record you're sending to! You can choose which role(s) an email should send from in order of priority, and choose a default sender just in case a recipient doesn't have someone in the role(s) you've chosen.
Here's where Fuse can be configured to send from your preferred Servicing Roles:
- Default Sender for your Fuse Workspace
- Custom Campaign Steps & Broadcasts
- Quick Start Campaigns
- Sending from Policy-Level Servicing Roles
Default Sender for your Fuse Workspace
Just open Fuse and navigate to All Settings > Email Sender & Signature.
From there you can choose "Send As" and select the link.
Here you can browse all of your servicing roles, check the ones that apply, and change the preferred order of selection.
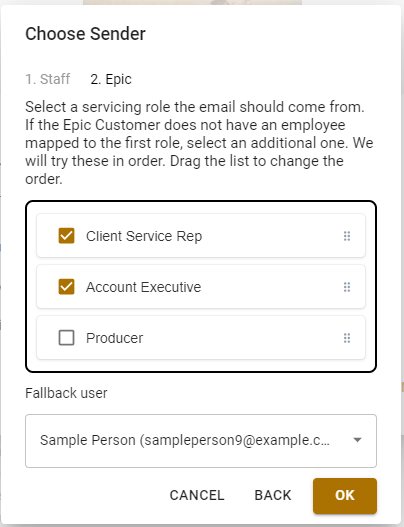
When sending an email to a customer, Fuse will scan the selected servicing roles in the order you provide until it finds the first match. Once a match is found, the email will send from that user. If none are found, the email will send from your selected Fallback user.
Custom Campaign Steps & Broadcasts
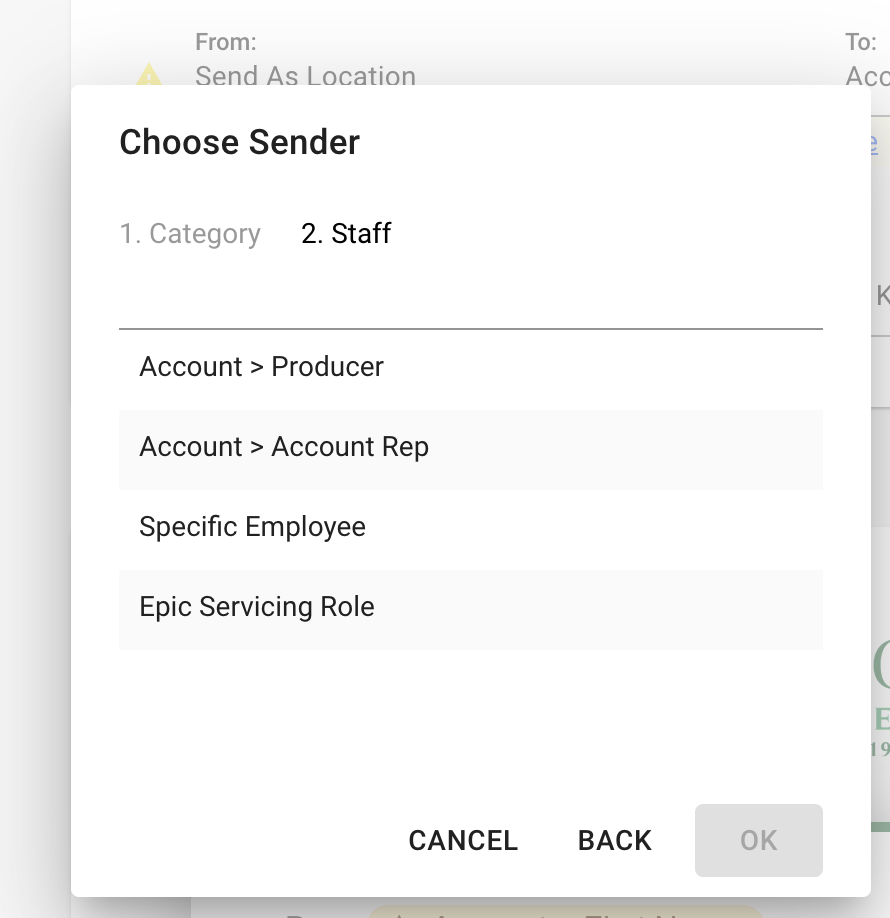
When in the email builder for a Custom Campaign Step or Broadcast, click on the "From" area and navigate to "Staff". Then select "Epic Servicing Role".

From there, the controls are the same as above.
You can browse all of your servicing roles, check the ones that apply, and change the preferred order of selecting.
When sending an email to a customer, Fuse will scan the selected servicing roles in the order you provide until it finds the first match. Once a match is found, the email will send from that user. If none are found, the email will send from your selected Fallback user.
Quick Start Campaigns
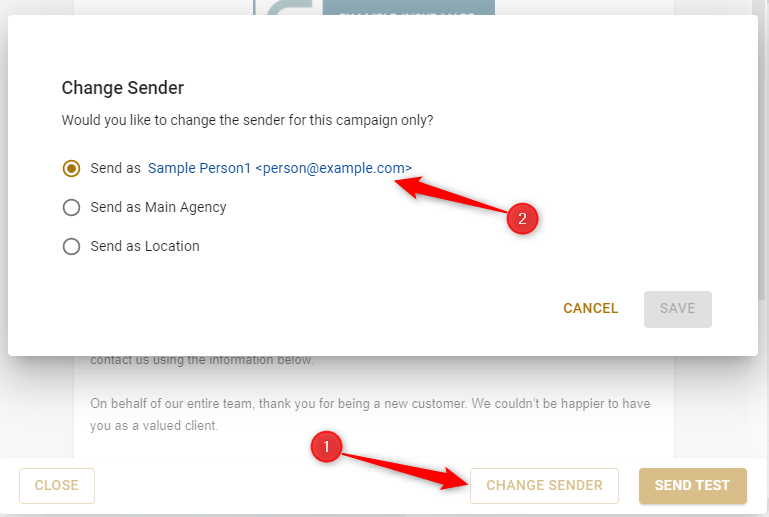
When viewing a Quick Start Campaign, simply preview the email you want to customize and click "CHANGE SENDER", then click the linked "Send as" name.
Next, navigate to "Staff". Then select "Epic Servicing Role".
From there, the controls are the same as above.
You can browse all of your servicing roles, check the ones that apply, and change the preferred order of selecting.
When sending an email to a customer, Fuse will scan the selected servicing roles in the order you provide until it finds the first match. Once a match is found, the email will send from that user. If none are found, the email will send from your selected Fallback user.
Sending from Policy-Level Servicing Roles:
Users can only send emails from Policy-Level roles within campaign sequences. The sequence must have policy context in order to know which policy to pull the Servicing Role from. Here's how to send from a Policy-level Servicing Role:
In a Step Sequence:- Add a Sequence of Steps to a campaign
- Select "In the Future" for when people are added and subtracted from the audience. Then select "Add/Edit Triggers."

- Next, click "ADD TRIGGER" to trigger when someone is added and/or removed from the sequence.
- Select a policy-specific trigger event (Each New Policy, Lost Policy, First New Policy, New Quoted Policy, Renewed Policy, Additional Policy, Policy Premium Change)
- On the sequence page, scroll down to the steps. This is where you can add a new email step or edit an existing one. Click on the pencil icon to edit an email.

- Now, click the "From" section on the email editor, choose "Staff" and select "Epic Policy Servicing Role" as the sender.
.png?width=492&height=507&name=image%20(19).png)
From there, the controls are the same as above.
You can browse all of your servicing roles, check the ones that apply, and change the preferred order of selecting.
When sending an email to a customer, Fuse will scan the selected servicing roles in the order you provide until it finds the first match. Once a match is found, the email will send from that user. If none are found, the email will send from your selected Fallback user.
In an Account Date Sequence:
Anchor the sequence steps to a policy date (e.g., Policy Expiration Date, Policy Effective Date, etc.). Click here to learn more about Date Sequences.
- Add the Sequence Type "based on Account's Date Field":

- Then, scroll down to the Steps section on the sequence page.
- Click "Choose Fields", then click "Policy" and choose a Policy Date Field:

- Once this is done, you can add an email step and click the "From" section on the email editor, choose "Staff" and select "Epic Policy Servicing Role" as the sender.
From there, the controls are the same as above.
You can browse all of your servicing roles, check the ones that apply, and change the preferred order of selecting.
When sending an email to a customer, Fuse will scan the selected servicing roles in the order you provide until it finds the first match. Once a match is found, the email will send from that user. If none are found, the email will send from your selected Fallback user.
In a Specific Date Sequence:
Configure the audience to add "One Subscriber Per [Policy]". Click here to learn more about Date Sequences.
Common Questions
What if a recipient doesn't have anyone entered in the Servicing Role the email is supposed to send from?
Not to worry! In that case, the email will send from your selected Fallback user.