
Note: This article is about Standalone Pipeline, a separate product from the Pipeline tool built into Fuse. If your workspace doesn't connect to an agency management system (AMS), you're in the right place. If you're looking for help with the Pipeline tool inside Fuse, visit our Fuse Pipeline help articles instead.
In this article, we'll cover:
How Do I Access Standalone Pipeline?
From the left sidebar, expand the Pipeline menu to find:
-
My Day: your due-date-driven lead dashboard
-
Pipeline: your pipeline board, where leads move through stages
Managers-level users also see two additional items:
- Pipeline Accounts: every contact in your workspace
- Reporting: a summary view for Manager-level users
Your workspace comes preloaded with pipeline templates, so you can start adding leads right away.
The Pipeline menu in the left sidebar, expanded to show Pipeline Accounts, My Day, and Pipeline.
The Pipeline Accounts page lists every account in your workspace, with status, lead count, and quick actions for each.
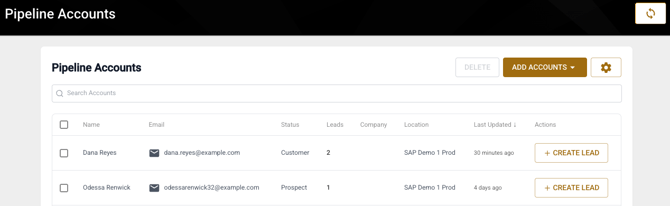
The Pipeline Accounts page, showing account status, lead counts, and quick actions.
Adding Accounts
Every lead in Standalone Pipeline is attached to an account. You can add accounts two ways:
Adding an Account Manually
-
Navigate to Pipeline Accounts.
-
Click Add Account.
-
Enter the account's details. Only First Name and Last Name are required, everything else (including email) is optional.
-
Click Create.
Tip: You can add an account without an email address. If you enter an email that already matches an existing account, you'll be prompted to edit that existing account instead of creating a duplicate.
Adding Accounts by CSV
- Navigate to Pipeline Accounts.
- Click Add Accounts and select the CSV upload option.
- Download the sample CSV template from the upload screen and fill it in. Only First Name and Last Name are required.
- Upload your file. Your CSV can contain up to 500 records.
- Review your file on the confirmation screen before completing the import.
Notes:
-
If a row in your CSV has an email address that matches an existing account, that row will be skipped so a duplicate isn't created. This is different from adding an account manually, which blocks you and offers to edit the existing account instead.
- Uploaded lists are automatically checked for valid, deliverable email addresses before being imported.
The Import Pipeline Accounts screen, with a link to the sample CSV template.
Adding Leads
Leads can be created directly from an account, or from within a pipeline.
Adding a Lead from an Account
- Open the account you want to create a lead for.
- Click Create Lead. The lead will be attached to that account automatically.
Adding a Lead from the Pipeline
- Navigate to your Pipeline.
- Click New Lead.
- Enter the lead's contact information.
- If the email matches an existing account, the lead connects to that account.
- If the email is new, or left blank, a new account is created automatically.
Adding Leads by CSV
-
Navigate to your Pipeline.
-
Click the dropdown next to New Lead and select Upload Leads (CSV).
-
Download the sample CSV template from the upload screen and fill it in. Only Contact First Name and Contact Last Name are required.
-
Upload your file. Your CSV can contain up to 500 records.
-
Review your file on the confirmation screen before completing the import.
Notes:
-
Unlike the Accounts CSV, a matching email address on a Leads CSV does not get skipped. Instead, a new lead is created and attached to that existing account.
- Uploaded lists are automatically checked for valid, deliverable email addresses before being imported.
The Import Your Leads screen, with a link to the sample CSV template.
Closing a Lead
You can close a lead as won or lost by moving it into the final stage of your pipeline. There are two ways to do this:
From the Lead Card
- Open the lead.
- Click the pipeline stage dropdown near the top of the lead card.
- Select the final stage of your pipeline (Quote Decision in the default Quick Start template).
From the Pipeline Board
- Navigate to your Pipeline.
- Drag the lead card into the final stage column.
Either way, a window will pop up asking if the lead was successful:
-
Select Yes - lead successful or No - lead lost.
-
If successful, confirm or edit the Customer Since date (defaults to today, and can be cleared).
-
If lost, select a reason why.
-
Add any final notes if you'd like.
-
Click Close Lead.
Note: Marking a lead successful updates the account's status from Prospect to Customer. Marking a lead lost does not change the account's status.
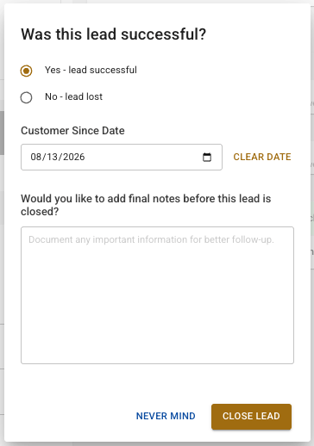
The Close Lead window: choose Yes or No, confirm the Customer Since date (or select a reason if lost), then click Close Lead.
Managing Leads with My Day
My Day helps you keep track of your leads by due date so you never miss a follow-up. It's split into a few key areas:
-
Leads to Engage Today: the leads that are due today, overdue, or due tomorrow. You can add a new lead directly from this section.
-
Missing Due Dates: leads without a due date set, so you can easily assign one and start working them.
-
Today's Progress: how many leads you've closed today, whether won or lost.
-
Your Recent Leads: the leads you've most recently opened, for quick access.
Tip: Set due dates based on priority, and work every lead to a closed state (won or lost) so your My Day view stays easy to scan.
The My Day dashboard: Leads to Engage Today, Today's Progress, Missing Due Dates, and Your Recent Leads.
Moving Multiple Leads at Once with Bulk Action Mode
If you need to move or delete several leads at the same time, Bulk Action Mode lets you do that without handling each lead individually.
-
Navigate to your Pipeline.
-
Click Bulk Action Mode, next to the New Lead button. Checkboxes will appear on each lead card, along with an Actions dropdown.
-
Select the leads you want to manage. You can also click the three-dot menu at the top of a stage column and select Select All to select every lead in that stage.
-
From the Actions dropdown, choose:
-
Move to a stage
-
Move to a pipeline
-
Delete selected
-
Unselect All, to clear your selection without leaving Bulk Action Mode
-
Note: Deleting leads is permanent. You'll be asked to confirm before anything is deleted.
Bulk Action Mode: select leads across one or more stages, then choose an action.
Leads and Accounts Without an Email Address
You don't need an email address to add a lead or account to Standalone Pipeline, this works whether you're adding one manually or by CSV. This is useful for tracking a prospect the moment you have a name, even before you have their contact information.
Note: If a lead without an email address is moved into a pipeline stage that has Pipeline Journey steps, every step in that stage will be skipped, not just email steps. This keeps a lead from getting tagged or held on a timer waiting on an email it never received. Once you add an email to the lead, moving it into a new stage will resume normal Journey behavior.
Moving a no-email lead into a new stage shows exactly which steps will be skipped.
Automating Follow-Up with Pipeline Journeys
Pipeline Journeys let you automate follow-up communication as a lead moves through your pipeline stages. Templates arrive as drafts and need to be launched before they'll start sending.